![]()
The Dashboard UI template node is used for mainly used for displaying data but it can also be used for data input.
The template widget can contain any valid html and Angular/Angular-Material directives.
If you aren’t familiar with angular then take a look at the w3 schools tutorial.
The UI Template node or widget performs a similar function to the template node and can often be used instead of the template node when displaying data.
You will also find it used with the template node as the template node itself can’t display the data. It can only format it.
The following screen shot shows common configurations using the template node and the template UI widget.

1. If you need to format the data .e.g. put into a table and don’t need to display the data then use the template node.
2. If you need to format the data .e.g. put into a table and also need to display the data then you can use the template node along with the template UI widget.
3. If you need to format the data .e.g. put into a table and also need to display the data then you can use the the template UI widget on its own.
Adding Custom Styles
The dashboard UI template node can be used to add custom styles to the node-red dashboard.
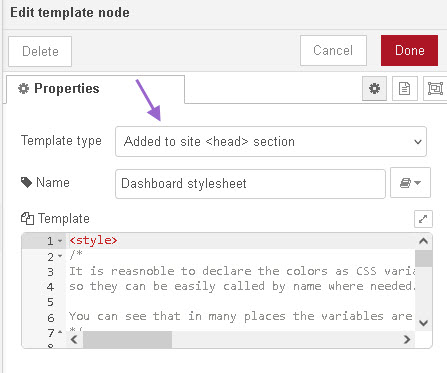
You need to configure the template type to Added to site <head> section as shown below:
Place the node anywhere in the workspace and the styles will be available in all flows.
Default UI Template node Configuration
If you drag and drop the template node into the workspace and open it you will see the following:

Note: The template type is set to Widgets in a group
If we used the inject node to inject the text “this is test” this is what we would see displayed.
Angular – A Quick Overview
Firstly I’m not a angular expert. I didn’t know what it was until I started using the template widget.
What I learned came from the w3 schools tutorials and hacking, and I still confess I find it confusing. However these notes will hopefully help you.
Angular uses what are called directives but they look like HTML attributes in that they go inside an HTML tag.
These directives start with the prefix ng-
So if we take the one shown earlier in the default template node we have.
<div ng-bind-html="msg.payload"></div>
The ng-bind-html binds the contents of the msg.payload to the div block so anything in the msg.payload would appear inside the div block.
So if our msg.payload contained an HTML table with data we would see the table displayed.
There is an alternative to using ng-bind directive and that is show below and is easier (IMO) to understand in uses the {{..}} format
<div>{{msg.payload}}</div>
The above does the same an says put the msg.payload here.
So the ng-bind and {{}} formats are used to display data, but how do we input data?
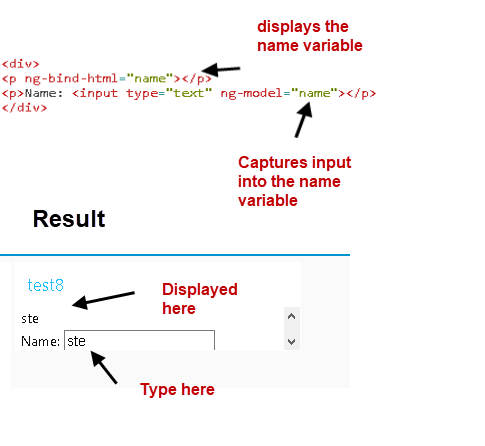
To input data we need a variable to hold the data and to use the ng-model directive. Here is an example.
<div>
<p ng-bind-html="name"></p>
<p>Name: <input type="text" ng-model="name"></p>
</div>
The name variable defined by the ng-model directive holds the input data and we can use the ng-bind directive to display it as shown below:
Using ng-repeat to loop Through an Array
If the payload contains array data you can use the angular ng-repeat command to loop through the array. If we take the data structure below which is an array with 2 objects:
[{“steve”:63,”Bella”:56},{“shanna”:30,”saskia”:27}]
If this is the payload sent into the template then we can loop through the array using:
payload in msg.payload
and then through the objects using:
(key,value) in payload
were payload is a variable name. Here is the actual code from the template node
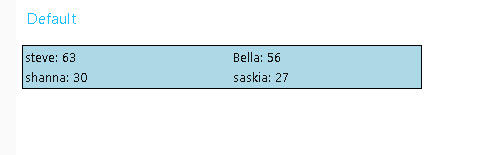
| <table class=”table”> <tr ng-repeat = “payload in msg.payload”><td ng-repeat =”(key,value) in payload”>{{key}}: {{value}}</td></tr></table> |
This is what it produces:
Here is the flow for the above.
Apps and Controllers
Because of the way the dashboard nodes are implemented you cannot create Apps or controllers.
The following is taken from google broups and posted by Julian knight
Not dummy at all! What you need to understand is that Dashboard is wrapped around Angular in such a way that you don’t get access to everything in Anglular.
So there are some gotcha’s. The main one being that you don’t get full access to $scope. Also you cannot create your own app/controller.
Videos
The use of this node is much easier explained in videos
Video 1-Using The Node-Red Template UI Node or Widget
Video 2 –Using The Node-Red Dashboard Template Dashboard Node or Widget-Part 2
Video 3 –Using The Node-Red Dashboard Template Dashboard Node or Widget-Part 3
Links mentioned in video 3
- https://www.w3schools.com/graphics/svg_intro.asp
- https://google.github.io/material-design-icons/
- https://discourse.nodered.org/t/material-design-icons-vs-font-awesome/12615/17
- https://material.io/resources/icons/?style=sharphttps://fontawesome.com/v4.7.0/
- https://fontawesome.com/v4.7.0/examples/
Resources
Related Tutorials and Videos
Hi Steve
That’s great stuff you built! Thanks for all.
Steve, I am a newbie and a beginner and I don’t know how to present the output data of the template node as a web page ( the actual screen ). How do I access the web UI that is formatted in the template mode?
I am trying to start from scratch and just be able to show in a dashboard/web page the data injected.
Do I have to access any other URL path? where is the data eventually deployed to?
Thanks!
Giora
The dashboard you will find on localhost:1880/ui
provided you are using defaults.
It us possible to change the path in the settings file
http://stevesnoderedguide.com/node-red-settings-js
this is usually done for extra security but I wouldn’t do that while you are learning.
Rgds
Steve
How would I create an input dashboard template where a message is sent only after pressing the enter key? I think I can start with the below and possibly add an ng-change directive but not sure how that would work.
Name:
What I normally do is hold the data in a context variable and release it when the enter key is pressed. I will try to fin a demo flow but it probably doesn’t use the dashboard ui but input widgets.
Rgds
Steve
Hi Steve
This series on the UI Dashboard Template Node has been great. Thanks so much for your well explained and informative tutorials.
You mentioned at the end of the last video that you might do another video on extending things like sliders and check boxes and the like. I’d like to suggest that you perhaps add the use of combo-box and list box controls to that.
Thanks again
Mark
Will do.
Rgds
Steve
Hi Steve ,
thx you for the video about dashboard. with node-red. I need to make a scada dashboard with specifics symbols . Can I draw own objects ? If yes does a such draw tool exist? Is it possible to send a global message ( to all objects bellowing to a class/group )? I assume the click on an object would be also possible ( the object will send a message click )
Greetings
Pat
You can use the template node for this.
I’ve used it to create dashboards with basic sliders and lights. You can us material design icons and I’m sure your own icons.
This is front end JavaScript which I don’t really do as I’m not a designer.
This forum discussion has links.
https://discourse.nodered.org/t/how-to-make-custom-ui-widgets/15340
I’ve done a tutorial on template node which I think explains the basic use
https://stevesnoderedguide.com/using-dashboard-template-node
Hi,
Great tutorial! Thanks.
Where can I find the example-downloads for the hi-template Tutorial? Would love to work them through to fully understand.
Thanks
Karl
They are in the video description if you click on the links to the video you will find them
rgds
steve