![]() There are two template nodes in node-red. They are the HTML template node and the dashboard template node.
There are two template nodes in node-red. They are the HTML template node and the dashboard template node.
In this tutorial we will discuss the HTML template node which is a core node, and is located in the function section.
The properties of the template node are shown below.
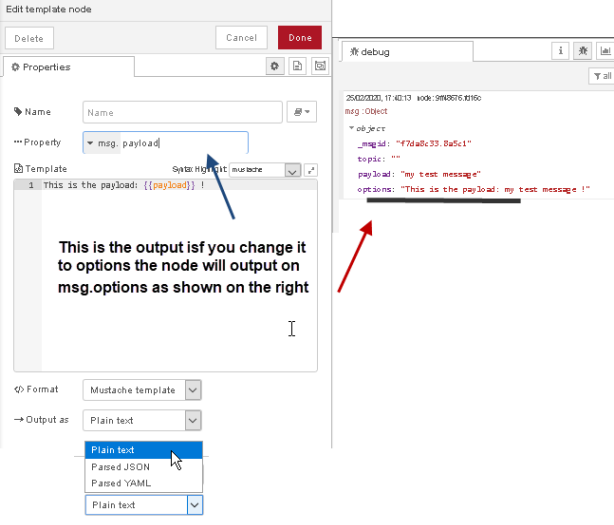
The node accepts input in the msg.payload object by default.
The field called property sets the name of the output object from the node.
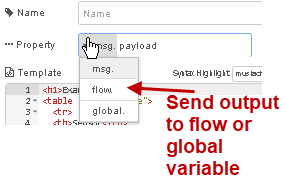
Normally this is msg.payload but you can change it to anything you want. e.g msg.options. You can even send it directly to a flow or global variable.
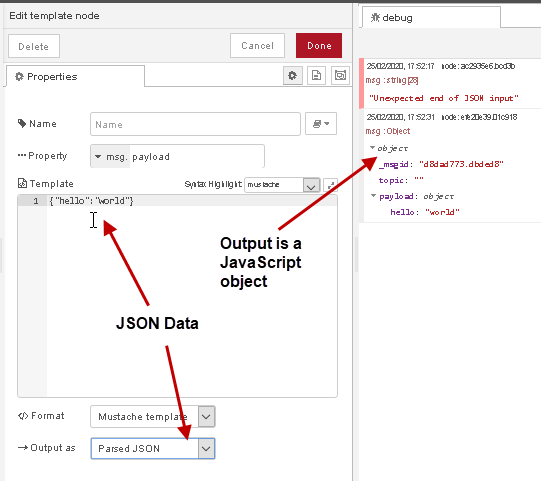
If the template contains JSON data or YAML data which is common when using the template as a configuration node you can output the data as a parsed JSON object or parsed YAML object i.e JavaScript.
Uses of Template node
Generally the template node is used for creating web pages and so generally contains contains HTML mark-up.
It can be used for dynamically inserting data into a page using Mustache templates which is the default configuration.
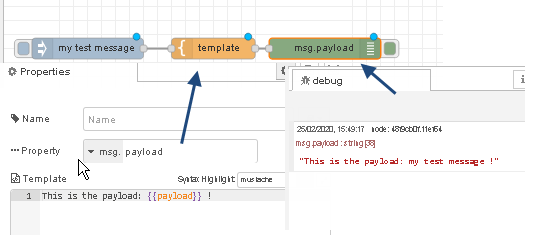
The example given in the documentation is a template containing the following:
This is the payload: {{payload}} !This is the default content of a template node when you drag it into the workspace.
If you inject a payload of “my test message“. The output of the template node will be:
this is the payload:my test message
You will often find the template node used for creating web pages when you are creating a node-red web server as shown in the flow below.
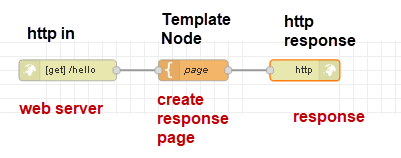
In this flow the request comes in on url /hello and the template node creates the response page, and passes it to the response node which returns the web page.
See –Node-Red Web Server -HTTP-IN and HTTP Response Nodes
It can also be used for formatting data to be displayed by the dashboard template node and this is what I mainly use it for.
In the flow below I have taken an earlier flow and added the dashboard template node.
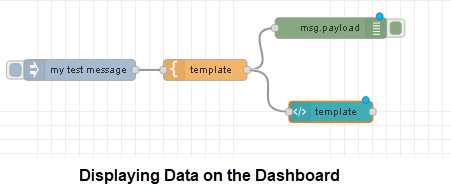
You can also use it for creating Initialisation data for other nodes. I use it in my database flows for creating tables.
If you look at my database videos (link below) and flows you will see that I use the inject node to create the SQL command to create the database tables.
This is easy to do for a small table but difficult for a large table and very error prone if you make changes.
In the flow below the inject node looks like this:
![]()
Note: it is actually a very long command.
So instead of putting the command directly into the inject node I use a template node and function node to create the command.
The template node looks like this.

This is readable and easy to edit.
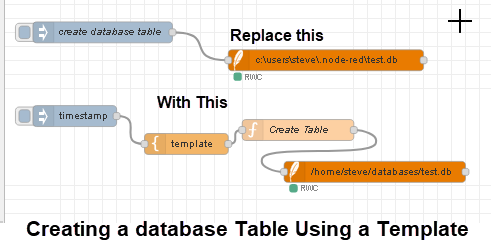
The function node is responsible for parsing the data from the template node and building the command.
When used as a JSON or YAML configuration node you can set the output to be a parsed JSON or parsed YAML object which basically converts the output to a JavasScript object.
This is shown in the screen shot below:
Mustache Templates
We saw Mustache templates at work earlier in the very simple example that comes with the documentation.
One of the most common uses is in looping through arrays.
To illustrate this I will use an example flow (labelled example1 in the flow download)
The data structure into the template node is an array of objects that is generated in the function node.
var sensor1={sensor:"sensor1",temp:21,humidity:60};
var sensor2={sensor:"sensor2",temp:27,humidity:67};
var sensor3={sensor:"sensor3",temp:30,humidity:69};
var array=[sensor1,sensor2,sensor3];;
In the template node we use this structure to loop through the array:
{{#payload}}

{{/payload}}
This is basically a for loop. Inside the for loop we create table elements and insert data using this code. Notice each array element is an object, and I have shown the contents of the first array element in the screen shot below.
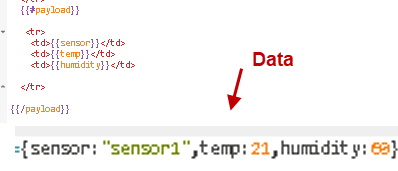
The output looks like this:
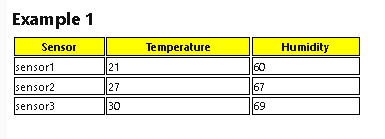
Using objects in Mustache templates is probably the easiest.
To use an array that contains simple values you can reference each value using the . notatation
Example
var array=["col1","col2","col3"];
To print each value of the array in a table use:
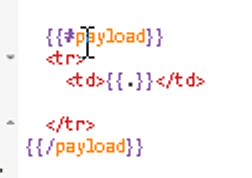
and this is what the output looks like:
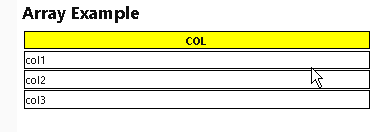
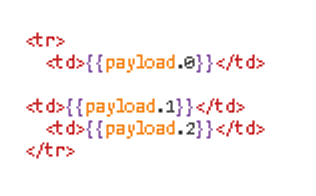
In the array example we used the loop construct we could access each element of the array using the array index.
Remember the array enters the template as payload and so the first element is payload.0
This is shown below for all three elements:
Examples
Example 1- Display crypto data
This data is taken from coin monitor via a rest API. I have thinned down the original list just to two cryptos to make it easier to demonstrate.
This is what we are going to produce:
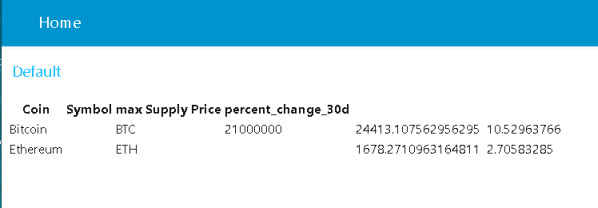
Note : i have made no attempt to line up the header as it is a demo only.
If I look at the data coming in in the node-red debug node I see this:
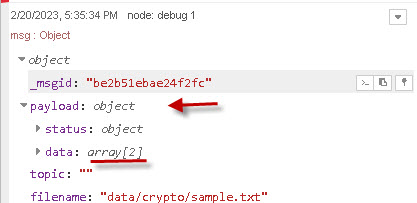
You should note that the msg.payload consists of two objects. The status object and the data object.
I am only interested in the data object which is an array with 2 elements.
Because the data object is quite complex I have pulled the data into the online JSON viewer.
This is what the data looks like and I have marked the data that I am interested in.
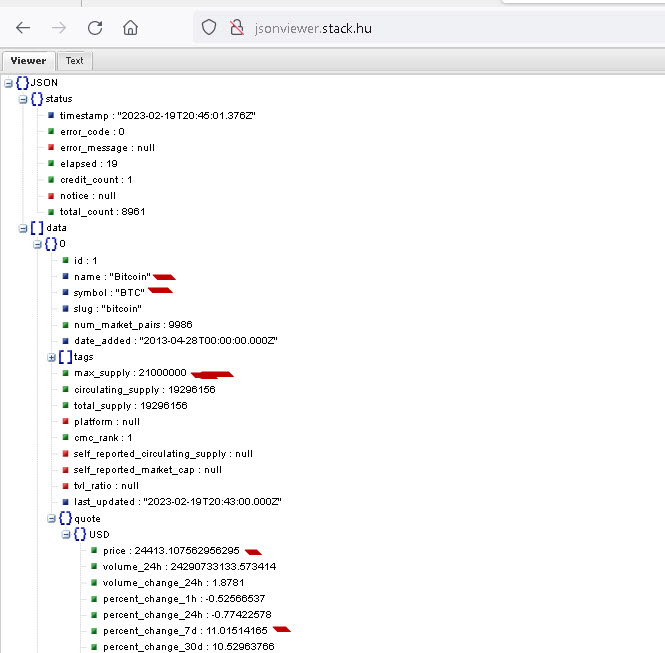
The name field is directly under data and is accessed using the code msg.payload.data.name (function node) or in the template using payload.data.name.
The price field is under msg.payload.data.quote.USD.price (function node) or in the template using payload.data.quote.USD.price.
Below is a screen shot of the template node.
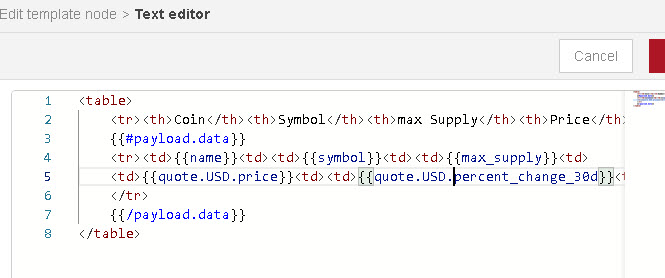
Notice the loop uses payload.data
This is what the actual flow looks like:
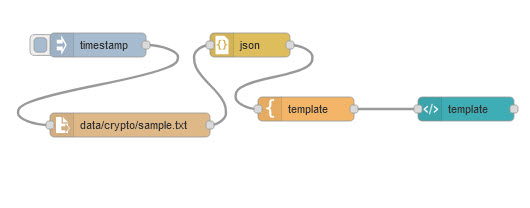
and this is the flow with sample data: 
Video
Summary
The HTML template node is a versatile node used mainly for formatting data for display on the dashboard.
It can also be used for creating web pages when used with the http-in and out nodes and also for configuration data.
Resources:
- Using the Template node flow
- Video –Using the template node
- Github on Mustache templates
- Node-red Storing IOT data In a SQL Database
Related Tutorials
- Node-Red HTTP Request Node for Beginners
- Using the Node-Red Function Node- Beginners Guide
- Using The Table DashBoard UI Widget Node
- Using the Control UI Node With Flow Example
- Using the UI Dashboard Template Node (Widget)

Sounds ok, when using fixed templates. But what if I have to use different templates?
Then you would need multiple template nodes.
Rgds
Steve
Hi! You may also interested in the MJML node for styled, responsive emails.
https://flows.nodered.org/node/@vergissberlin/node-red-contrib-mjml
MJML is a syntax which creates email conform HTML.
tks for that.
Rgds
Steve
Thanks for sharing
Thanks You
Concise and easy to follow. Very well explained.