
![]() Influxdb is specially designed for time series data and as such it is a popular choice for storing sensor type data.
Influxdb is specially designed for time series data and as such it is a popular choice for storing sensor type data.
Influxdb underwent a major change in version 2.0 and so you need to careful what version you are using.
In this tutorial we will be using version 1.8.
For creating and querying the database there are two command line tools
- flux -used for version 2.
- influx -used for version 1.x and 2.
Note: Depending on your 2.x version influx CLI may need to be installed separately.
Using Influxdb version 1.8
You can install this version by following the procedure here.
You need to select your OS and version and the instructions are shown. See below
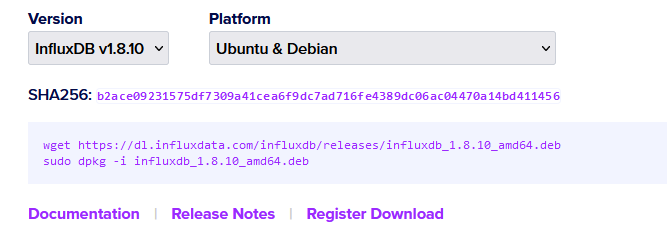
For Debian/Ubuntu you can copy the code here:
wget https://dl.influxdata.com/influxdb/releases/influxdb_1.8.10_amd64.deb
sudo dpkg -i influxdb_1.8.10_amd64.deb
Influxdb runs as a service and is configured using the config file (influxdb.conf) in the /etc/influxdb folder.
The service also opens several ports. The one used for the database is usually 8086.
You can check that it is running using:
netstat -alt
In the http section of this file you may need to enable the http endpoint.
If you change the config file you will need to restart the database service
sudo service influxdb restart
Node-Red Influxdb nodes
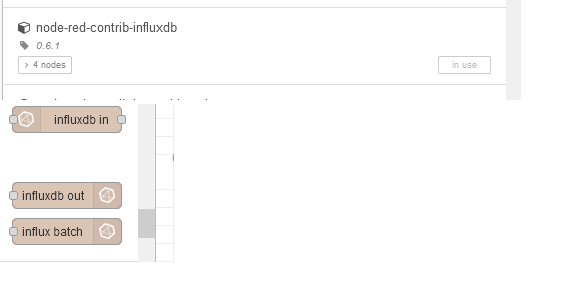
You will need to install the node-red-contrib-influxdb nodes. Four nodes are installed and three are available from the palette under the storage section .
The fourth is a database server configuration node which can be accessed in the other nodes when selecting a database or the configuration sidebar.
Configuring a Database Server
This you configure from either the out or in node by clicking on the pencil icon on the right.

When configuring the database server you need to select the CLI as either flux or influx. You should select 1.x for influx.
You will need to configure the port and the IP address of the influxdb server as well as the name of the database to use.
The database isn’t created automatically and so you will need to create the database from the command line as shown later.
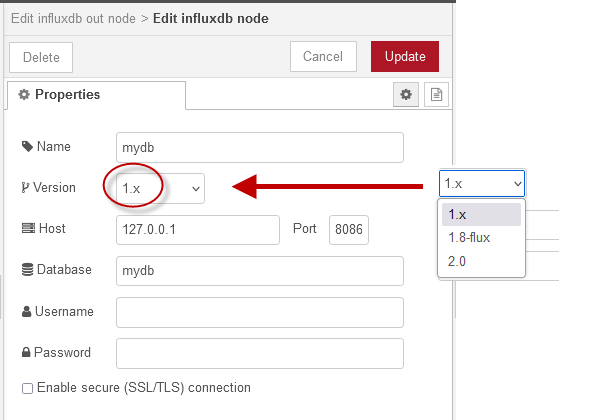
Don’t select 1.8 - flux unless you want to use the flux query language with influx 1.8.
For Influx 1.8 using the SQL syntax then 1.x is the best option, as that works with 1.anything. See here
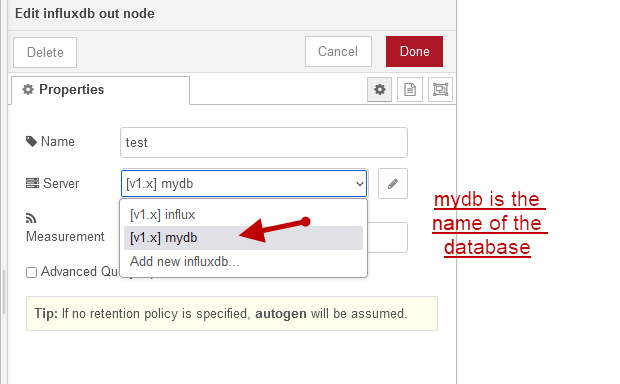
When selecting the server select the one with your database name.
To create a database open a command line and type influx.
Then type create database databasename.
e.g
create database mydb
You can see a list of all databases using the show databases command.
Writing data to the Database
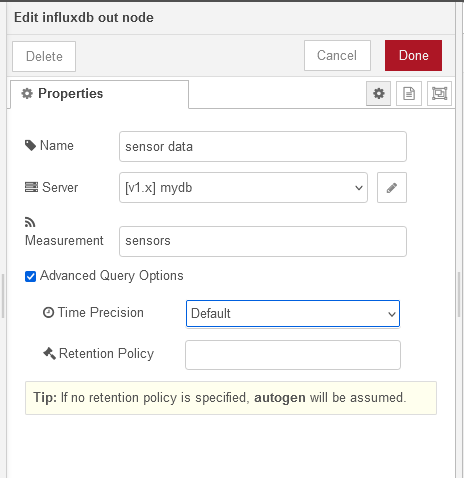
To write data we use the out node and we need to select the database server and also the measurement.
The measurement field is equivalent to the table in SQLite and doesn’t need to be created in advance.
If you click the advanced option box you can configure the time precision and Retention Policy. Just keep them as default.
The data to be written needs to be sent in the msg.payload and needs to be in the correct format. Which is usually an array of JavaScript objects, but I believe other formats are also supported.
If you are not already familiar with influxdb then I suggest that you take a read of the following before continuing:
- Influxdb schema – Section on schema concepts
- Influxdb concepts
Example Data
This is example input data is taken for a temperature/humidity sensor in the form of a JavaScript object.
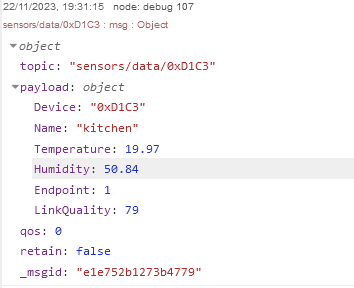
We are interested in storing temperature and humidity data for the device and so ee will need to extract them from the incoming data.
So we will have fields for time, temperature and humidity and tags for device name name.
The general structure for the data is.
[{fields},{tags}]
so our out msg.payload we look like this.
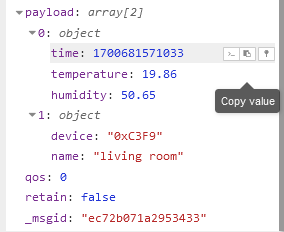
As far as I understand it the presence of a time value indicates that we are dealing with fields and not tags.
Both fields and tags are key:value pairs but tags are indexed whereas fields are not
This is the function node code to do this:
let payload=msg.payload;
let msg_out=[];
let temp={};
let temp1={};
let d= new Date();
let now=d.getTime();
temp = { "time":now,"temperature": payload.Temperature, "humidity": payload.Humidity };
temp1 = { "device": payload.Device, "device_name": payload.Name};
msg_out.push(temp);
msg_out.push(temp1);
msg.payload = msg_out;
return msg;
Notice that we create an object for the fields called temp and one for the tags called temp1. We then add them to an array to send to the database.
The big advantage of using influxdb over sqlite is that if we decide later on to add another field then we don’t need to change the table structure as we do with sqlite.
Query The Influxdb Database
Before you do this with node red it is a good idea to try the command on the command line as shown below:
use database mydb
select * from sensors
select* from sensors where device='0xD1C3'
select* from sensors where "name"='kitchen'
Notice the single quotes in the tag value and in the second example the double quotes in the field called name.
The double quotes are only necessary because the word name seems to be reserved.
If I had used device_name for the tag then the query would look like this:
select* from sensors where device_name='kitchen'
Notice no double quotes
To query the database we use the in node. We can insert the query directly in the node as shown below:
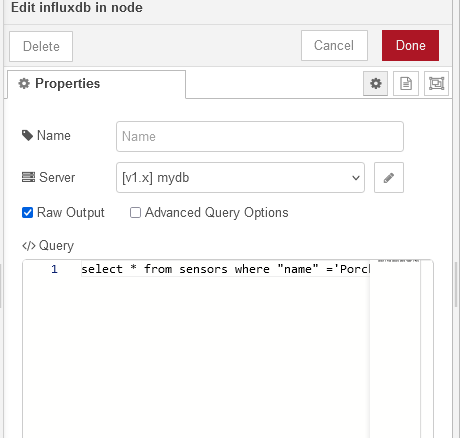
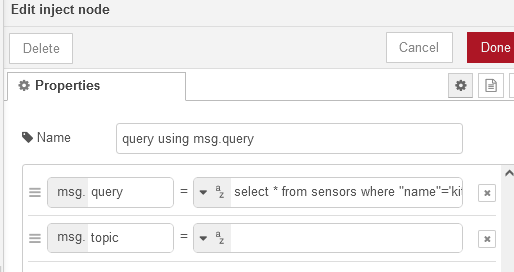
Alternatively we can pass the query into the node using msg.query as show in the inject node below.
Demo Flow
Below is a demo flow that I used when creating this tutorial.

Common Questions and Answers
Q- Can I store time series data in SQLite?
A- Yes. See Storing and Retrieving JSON Data In SQLite
Q- Should I use Influxdb for my Time series data and not SQLite?
A- It all depends on your application and expertise. Influxdb is far more complex than SQLite and requires more server resources.
Summary
Influxdb is a very popular choice for storing time series data. It is generally more flexible that SQLite as you don’t need to predefine fields and you can just add and remove them without modifying the database schema.
However if you store the data as JSON data in SQLite then you also have the same flexibility.
Personally I find SQLite easier and works well on small applications.
However if you want to use Grafana to view your data then influxdb is the better choice.
Influxdb is also available as a docker image.
Related Tutorials and Resources
- Node-Red – Storing IOT Data in a SQL Database
- Node-Red SQlite- Using a Prepared Statement
- Storing and Retrieving JSON Data In SQLite