
![]() The control UI node allows dynamic control of the dashboard.
The control UI node allows dynamic control of the dashboard.
A typical use is for creating dynamic menus.
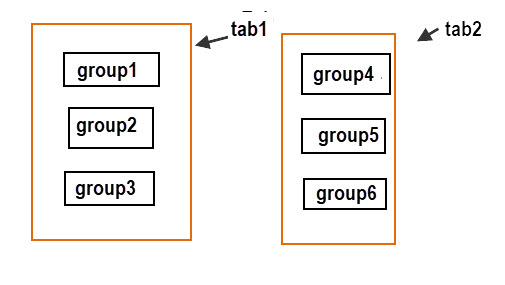
A dashboard consists of tabs and groups.
Dashboard nodes are placed in groups and groups are placed on tabs as shown in the diagram below:
For example if we have a complex Application consisting of multiple control screens configured as tabs we can often simplify the design by placing multiple tabs on a single tab and hiding the groups that are not required.
In the diagram above we have two tabs each with 3 groups which contain a variety of ui nodes.
The reason that the groups are on different tabs is that there is a logical separation.
We can still maintain this separation if we combine the groups onto a single tab and hide the groups that are required.
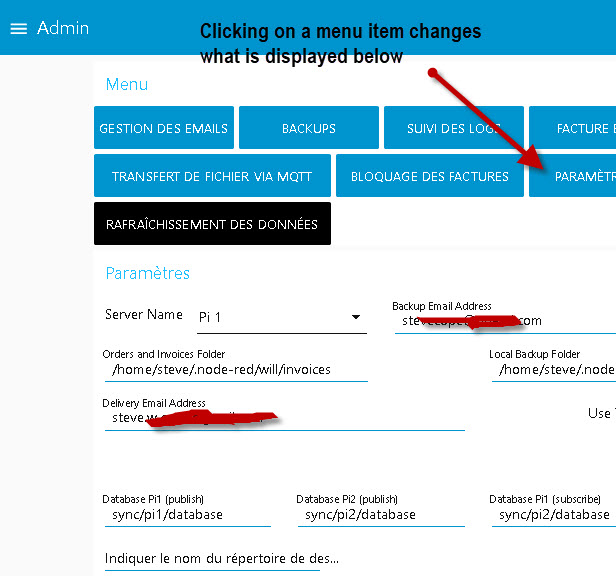
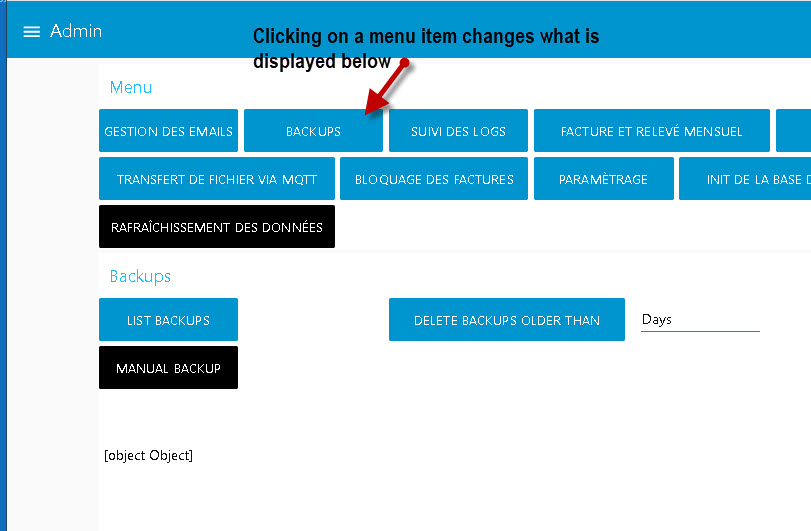
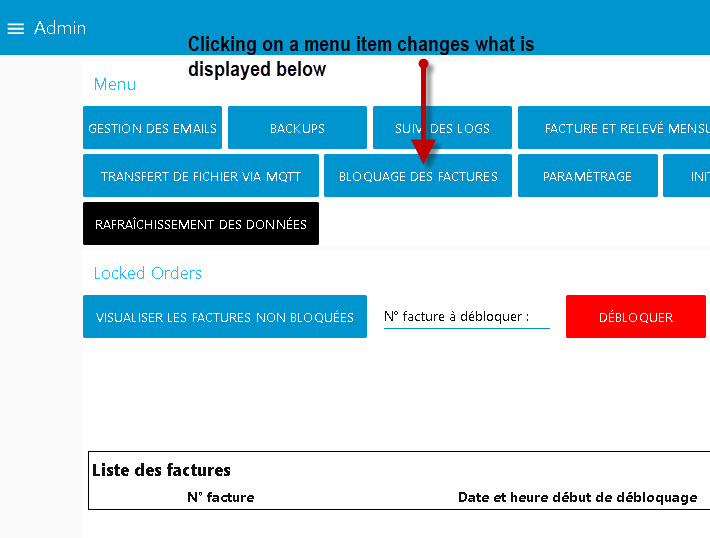
This is easier shown using a demo and below you will see a menu taken from a real application.
In the example below all of the groups are configured to use the same tab, the Admin Tab, and the main menu appears on the top.
Clicking on a menu item changes what appears below the menu as shown in the three screen shots below.
Control UI Example and Flow
To Illustrate this I will use a simple flow consisting of 2 groups.
Groups 1,2 will be displayed together and groups 3,4 will be displayed together.
The menu is simply labelled admin1,admin2 and reset, and is shown below:
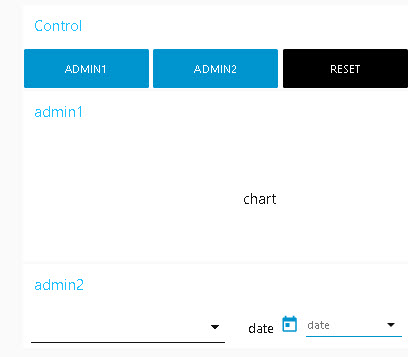
Clicking admin 1 displays the groups 1,2 and clicking on admin2 displays the groups 3,4 both on the same tab called admin.
To display both groups at the same time click on reset.
The nodes in the example group aren’t completely configured i.e the graph node isn’t displaying any data, but this isn’t important for the demonstration.
To display/hide groups we pass an object into the control UI node.
The flow help screen goes through the parameters that are available but below is the code I use for each of the buttons.
Button Admin 1 -Click this button will hide the admin2 nodes but display the control node containing the menu and the admin1 nodes.
{
"group": {
"hide": [
"Admin_admin2"
],
"show": [
"Admin_Control",
"Admin_admin1"
]
}
}
Notice the main object is called groups and has two objects called show and hide. We place the groups to be displayed in the show object and those we want to hide in the hide object.
The groups are referenced by the tab name followed by an underscore and then the group name and are case sensitive.
So in the example Admin is the tab name and admin1,control,admin2 are group names.
Button Admin 2 -Click this button will hide the admin1 nodes but display the control node containing the menu and the admin1 nodes.
The code is shown below:
{
"group": {
"hide": [
"Admin_admin1"
],
"show": [
"Admin_Control",
"Admin_admin2"
]
}
}
Button Reset -Click this button will display all groups and nodes.
The code is shown below:
{
"group": {
"hide": [],
"show": [
"Admin_Control",
"Admin_admin2",
"Admin_admin1"
]
}
}
Controlling Tabs
We can also use the control ui to move between tabs. Again I have created a simple menu that will move between the Admin tab and the home tab and is part of the flow. This is the menu:
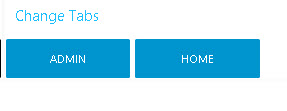
The code for the buttons is:
Admin Button:
{
"tab": "Admin"
}
Home Button
{
"tab": "Home"
}
Flow Example
The best way to learn about this node is to use it. Below is a flow that is used as a basis for this tutorial and also for a video that should get you started.
Note:The Node help is very useful and I recommend you take a look at it.
Video -Using the Control UI Node
Summary
The control UI dashboard node is used to create and switch menus and tabs dynamically. Although I have shown this using buttons it can be achieved using code in a flow e.g the menu can be altered depending on a condition in a flow.
Related Tutorials and Resources:
- Node-Red HTTP Request Node for Beginners
- Using the Node-Red Function Node- Beginners Guide
- Using the Node-Red Chart Node
- Node-Red Web Server -HTTP-IN and HTTP Response Nodes
- Using the Exec Node to Run External Commands
- Using the Node-Red Template Node
Hi Steve – great content! Is it possible to hide the Hamburger + Admin title bar entirely, and run the page with the buttons only?
Thanks!
I don’t believe there is but it is something I’ve never really looked to do, but I had a quick look at the settings and didn’t see anything
Rgds
Steve
Hi Steve
Thanks for this video, really useful.
1) I wonder if you could update it to also say you need underscores when the tab name or group name has multiple words? (I know it says that in the help file in Node-RED, but I only found that out after a while of not reading the instructions and being guided by your tutorial here! So maybe it will help others?)
2) It’s a shame that you cannot order groups within a tab, using the show / hide JSON isn’t it? I have some different views that comprise mostly different groups, but some of the same groups. In those cases it’s useful to present groups on the page in different orders…
Thank for the guide, I’ve tried the example flow, “Admin1”, “Admin2” and “Reset” buttons are working, but “Admin” and “Home” buttons are not working as described in the video.
Would you mind checking the flow and update it?
Thank you
Hi
Tks for pointing that out the reason was that there was no node assigned to home. I have corrected the flow.
Rgds
Steve
Hi Steve,
great stuff and it´s a lot of fun to follow all your videos, explanations and examples.
In this example however it had taken me some time to understand the tab function, since in the download example the home tab etc was missing. Once added it also made sense to me.
Thanks again for all your great effort and very helpful documentation.
Greetings Heinz
Steve, just a huge thank you for all your guides and YouTube videos. So many times, as I look for Node-Red info (and MQTT info) I arrive at one of your guides and videos and I find just what I am looking for. Again, a really big Thank You.
Tks for the nice comment.